Press "Enter" to skip to content

Posts published in “Antennas”

Operating from Home

Thanks to Clayton KJ4RUS going up the tower along with ground crew Bob N2ESP, Pat AA0O and Ed NZ1Q, I have a wire antennas on the tower. Clayton climbed the tower to put a rope in the tower standoff’s pulley and the ground crew connected things so the antennas could be raised. The ends were tied off and it all seems to work well.

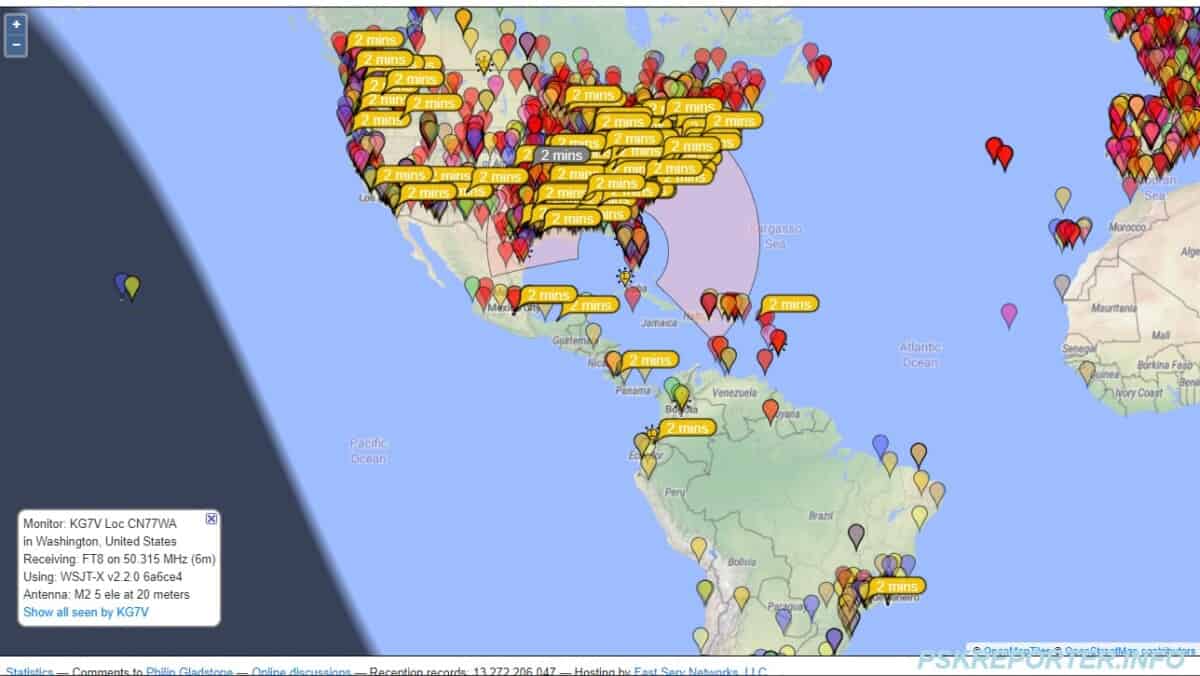
The picture below is of a contact I made on FT8 showing the coverage of the antennas on 20 meters. This looks like a great pattern for Field Day. Everywhere with a time flag is a station that heard my signal. The station in Brazil heard me at -10 db and the one in Washington State at -16 db.

My thanks to all that helped!

The Tower Shopping List

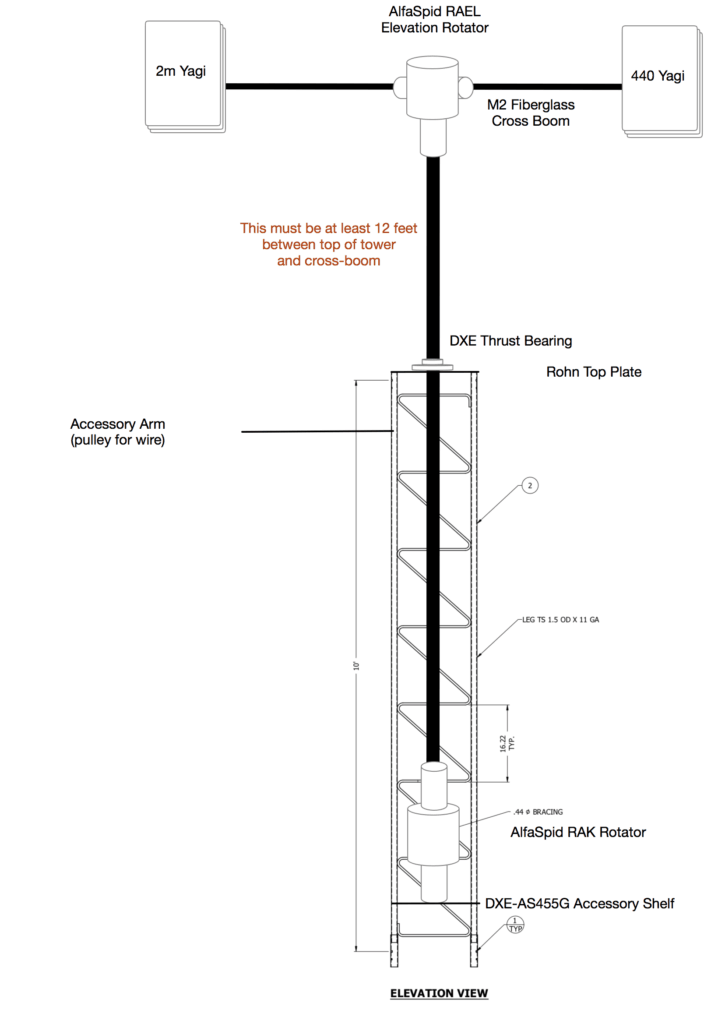
My goal with this tower is to built an exception satellite station so I can try for WAS and DXCC on Satellite. While WAS is doable, the DXCC part will need lots of low angle AO-7 passes and FO-29 passes. With that in mind, I decided to install some very high gain antennas. I like the quality of construction of other antennas I have from M2 so I decided for their biggest satellite antennas. Of course, I also need an rotator to adjust both the Azimuth and elevation. I opted for separate rotators in case I decide I want to put a small HF beam at the bottom of the mast.

Here is the bill of materials (BOM):

  • AlfaSpid RAK Rotator inside tower
  • AlfaSpid RAEL Elevation Rotator
  • KF7P AlfaSpid Flat-plate adapter
  • DXE-AS455G Accessory Shelf
  • DXE-TB-300 Thrust Bearing
  • DXE-ST200CM-22 Chrome-Moly 22’ mast
  • Rohn ROH-BPL55G tower bearing plate
  • KF7P Antennas Standoff Arm
  • KF7P Standoff Stabilizer Arm
  • M2 Crossboom HD FG 11’
  • M2 436CP42UG 430 Mhz Yagi (18’)
  • M2 2MCP22 2m Yagi (19’)

Station Building

I ran across a very good blog on building a station. This chap built it from soup to nuts including the room, adding A/C, generator, two contesting operating positions and more. There are many good ideas in his station building series. Look here for more.

Remote Switched Coil for 80m and 160m with a 43′ vertical.

As many of you know, I have a Zero-Five 43′ vertical that I–in concert with the Alpha 9500–managed to set on fire. My 43 foot antenna works OK on 80m (good worldwide DX) and even decent range on 160m, but I have a terrible VSWR on 80 and 160. My Palstar and Ten Tec 238 manual tuner can handle it even at 1500, but rather than have such terrible losses in my 150 feet of coax, I decided it would be a fun project to build a remote-switched coil setup that will work with my UNUN for the rest of the bands. You can read more about the project from the website of Phil Salas, AD5X. Phil has a great website with articles describing his work and analysis of the 43 foot vertical.

Normally I stay away from MFJ gear, but Phil listed them as a source for the coil for 80 and 160. As this is just a single coil with no moving parts, I figured I was safe in using the MFJ part. 🙂 I ordered the coil and insulators from MFJ last week. I need to get the relay from Array Solutions and some parts from Mouser.

I will still need a tuner with this for 60 – 10 and for that, I am anxiously awaiting the arrival of the Alpha 4040 4KW auto antenna tuner. It is shaping up to be quite the box.

I will update my site as I progress through the project along with some pictures. Fall is a great time for antenna projects in Florida and what better than getting ready for winter DX on 80m and 160m?
Finally….toning cables…

After many years dealing with telecom (and using other people’s toning tools), I broke down and got a nice Fluke cable tester and tone tool. The tool is a Fluke Networks MT-8200-60A IntelliTone Pro 200 Kit . This started because I have to tone out a bunch of coax cables from the back of the house and I tend to do those things as time allows without anyone else around. The tester has an F connector on it so I can hook up an F connector to N female patch cord to connect coax cables. It also have alligator clips to allow hooking to bare wires or even a jack that will check RJ45/RJ11 connectors. Once I get it on Tuesday I will give it a try and report back.


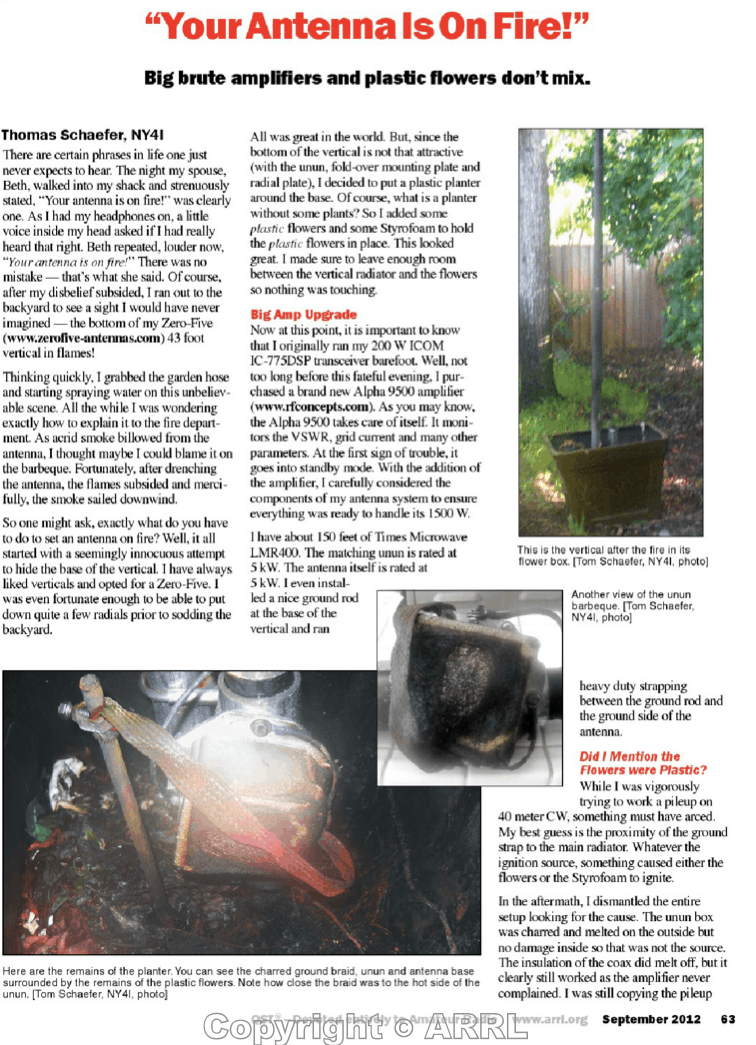
Your Antenna is on Fire!

I wrote an article for QST that was published in the September 2012 issue. I was fortunate enough to win the QST Cover Award for that article. You can find a PDF of the article here:

Fun with Heliax Connectors

I finally took the time to learn how to install connectors on Heliax LDF4-50A 1/2″ hardline. I have the Positive Stop right angle connectors as well as older style “solder the tip” connectors. I also have a CPT-L4ARC tool that hooks to my drill. The automatic stripping tool ended up being the most trouble to learn the right way to use that. I learned that the solder connectors are not going to be the easiest ones to use in the field, but they do make a nice joint.

The secret to learning was I took a 2 foot piece of cable and 2 hours to try the installation multiple times until I became comfortable with it.